|
This emblem ☯ is sometimes referred to as the yin yang symbol. However, it is properly called the taijitu and it represents the religion of
Taoism. The taijitu displays a reconciliation of opposites. (Notice the small dot of white in the blue area and the small dot of blue in the white area, showing that each of the large areas contains a smaller amount of the other large area?)
Still, if you are here, you want to know how to draw it right?
Drawing the Taijitu Using Compass and Ruler

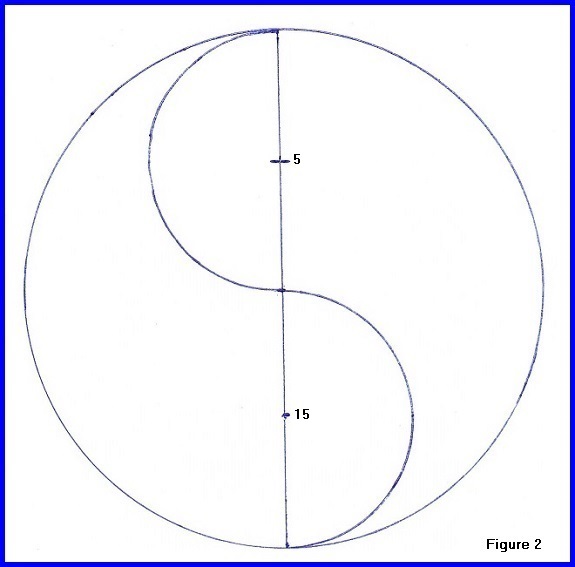
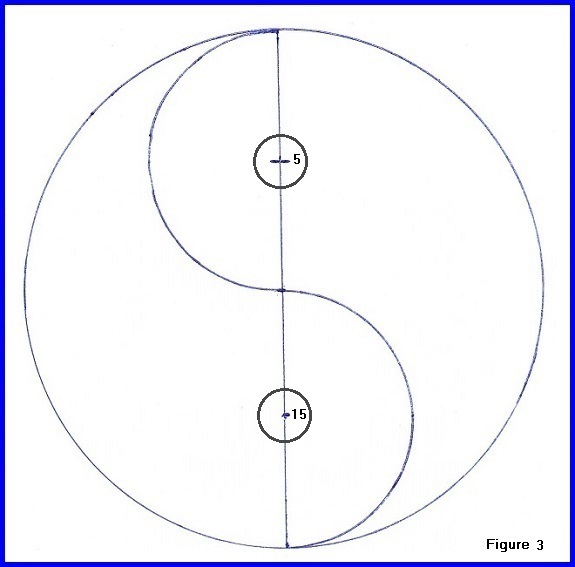
Figure 1
Get a blank piece of paper about 8 ½" × 11".
Set the compass to a radius of 10 centimeters and draw a circle on the paper.
Now, with the ruler, draw a vertical line through the circle.
Mark the line at 5, 10 and 15 centimeters.
(The 10 centimeter mark should be exactly where the compass point was).
Figure 2
Set the compass to a radius of 5 centimeters.
Place the compass point in the 5 centimeter mark and draw a semi-circle.
Place the compass point in the 15 centimeter mark and draw a semi-circle.
Figure 3
As for drawing the small circles, I was not able to find any instructions as to their size, but I usually draw these with a radius of 10% of the larger circle.
So, set the compass to a one centimeter radius and draw a circle around the 5 cm and 15 cm marks.
Now fill in in both sections with colors of your own choosing.
Drawing the Taijitu Using Your Computer
 Figure 4
If you have a Windows™ computer, you will have a graphics program called Microsoft Paint™ with which you must be
very familiar before attempting this graphic.
(We suggest you save the graphic you draw as a .gif or .png file.)
From the main menu, click "properties" and select "pixels" for the units.
Choose an entirely white background and make the graphic size 650 by 650 pixels.
a) We'll begin with drawing the large circle.
Click the circle icon, then choose the thinnest line (1 pixel wide).
Move the mouse cursor to the extreme upper left corner of the graphic so that the cursor coordinates read "0, 0 px".
Click the mouse (keep holding the button) then move the mouse until the coordinates read "600, 600 px" then release the mouse button. The large circle is now complete.
b) Drawing the 2 smaller circles:
Click the circle icon then move the mouse cursor to coordinates "150, 0 px".
Click the mouse button (keep holding) then drag the mouse until the coordinates read "450, 300 px" then release the button.
Click the circle icon then move the mouse cursor to coordinates "150, 300 px".
Click the mouse button (keep holding) then drag the mouse until the coordinates read "450, 600 px" then release the button.
c) Drawing the 2 smallest circles:
Click the circle icon then move the mouse cursor to coordinates "270, 120 px".
Click the mouse button (keep holding) then drag the mouse until the coordinates read "330, 180 px" then release the button.
Click the circle icon then move the mouse cursor to coordinates "270, 420 px".
Click the mouse button (keep holding) then drag the mouse until the coordinates read "330, 480 px" then release the button.
Click on the "eraser" icon and use it to erase one half of each of the "b)" circles.
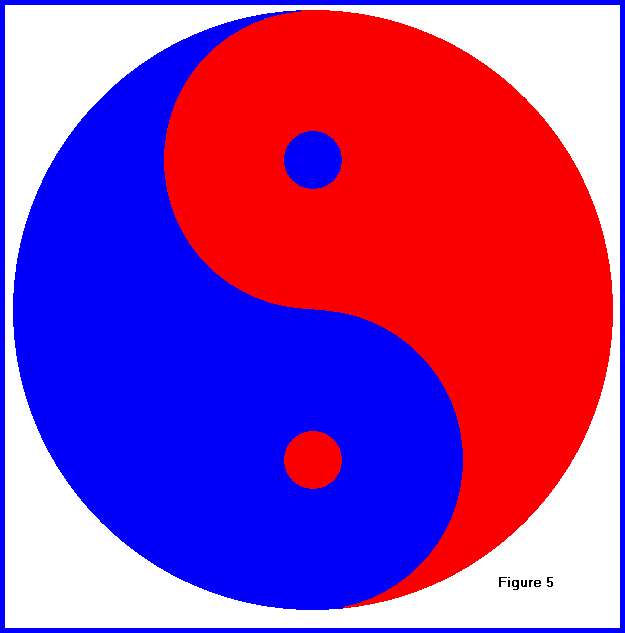
Figure 5
Click on the paint bucket icon to fill in the graphic with colors.
It is traditional to fill in the small circles with the color of the other surrounding area. However, it is your drawing so feel free to do what you want.
|