Actually, you can have all the volume and tone settings at zero, but when the solo switch is "on", it's just as if you had everything set to "10". (Actually, the sound is a little bit brighter than "10" because even at their maximum settings volume and tone controls still put a "load" on the output signal).
1 Volume 1 Tone Control Guitar
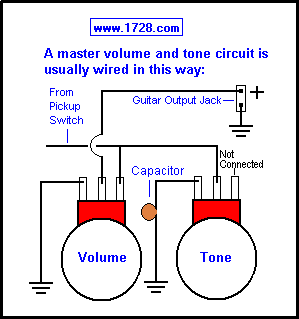 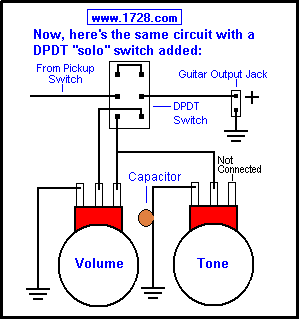
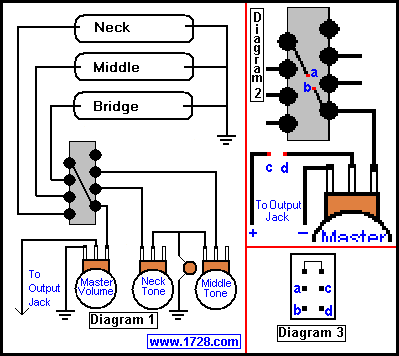
This section deals with wiring a "Solo Switch" for a guitar with the circuitry of the Fender Stratocaster™ or one of the countless copies manufactured with the same design. If you have a 3 pickup guitar (usually 3 single coils), that has one "five-way" switch, one master volume control and 2 tone controls, this is how to wire a solo switch into it.
Diagram 1 is the way your guitar is currently wired.
2 Volume 2 Tone Control Guitar Due to the complexity of the wiring of dual volume and tone control guitars, it is not possible to bypass 2 volume controls, 2 tone controls and 2 capacitors with just one DPDT switch so some compromise had to be made. One disadvantage is that, unlike the other 2 circuits, this "Solo Switch" can only activate the bridge pickup. However, one advantage is that it will bring the bridge pickup into the circuit no matter what position the pickup selector is in. (This does not apply to the previous 2 circuits). Still, if you want a true solo switch, go to the next section.
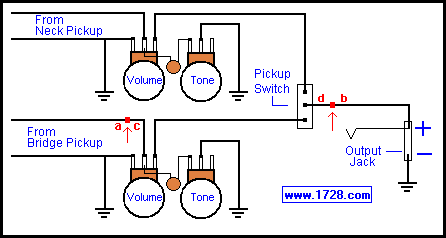 For this modification, you will have to cut the wires at the positions indicated by the red arrows. Solder 4 extension wires at these locations. To make certain that you wire the circuit properly, the detailed graphic below is much easier to follow.
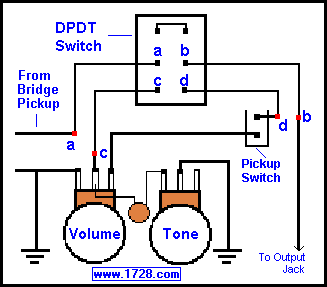
Now, following the letters exactly, solder the 4 wires to the DPDT switch. When you are certain the wiring is correct, close up the guitar, plug it in and try out that new solo switch you just wired in.
2 Volume 2 Tone Control Guitar Okay, if you have scrolled down here, you are a purist who will settle for nothing less than a genuine solo switch that can bypass all four potentiometers and both capacitors. As you probably thought, there must be a "catch" right? Actually, there are a few. Instead of a DPDT switch, now you must use a 4PDT switch, which is a little harder to find and more expensive than the DPDT. The 4PDT switch has twice the terminals of a DPDT. (larger switch space and more soldering) Instead of two connections for cutting and soldering wires, you now have to deal with four. (see diagram)
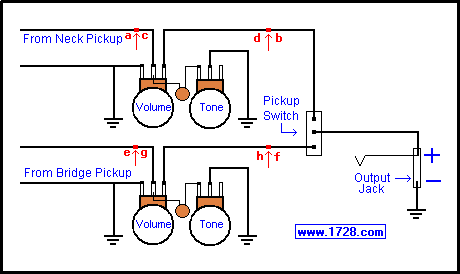
The above diagram is the circuit for the Gibson Les Paul™, the Gibson SG™ and the many
copies of these guitars. If you have a guitar with 2 volume and 2 tone controls, it would
probably be wired in just this way. 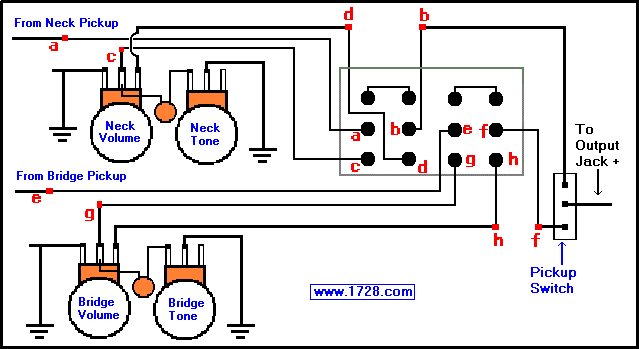 Now, following the letters exactly, solder the eight wires to the 4PDT switch. When you are certain the wiring is correct, close up the guitar, plug it in and try out that new solo switch you just wired in.
Copyright © 1999 - 1728 Software Systems
| ||||||||||
